There are many ways to prepare a bed for planting vegetables. Some, like double digging, are incredibly labor intensive. I've spent many a spring soaking a sore lower back and repairing my winter-tender hands after a day in the garden. I've discovered that preparing a garden doesn't have to cause back problems or aggravate my arthritic hands.
Usually preparing a new garden involves three things - removing whatever is already growing there (usually grass or weeds), loosening the soil underneath, and improving the soil. In the past, I've used a shovel, hoe, pick, a rototiller, and my own bare hands to accomplish the first two steps. In the past year I've been using a much easier method. Starting now (or preferably, later in the cooler weather of autumn), you can prepare a bed for planting next spring with minimal physical exertion.
Once you've determined where you want your garden (I'll leave the size and shape up to you, just think that wide beds with narrow aisles allow more planting and less weeding), you can start to get it ready for spring planting. What you will do is leave most of the green stuff growing there to help add organic material (food for your veggies) to the soil. Nature's little helpers - worms and other organisms in the soil, will help loosen the soil. Mulch that you add will also help improve the soil. You'll be able to plant in the spring with minimal effort. I promise. Starting in the fall means that your soil will be improved over the winter with the help of worms and other critters in the soil. Worms are your friends. They will help break down organic material, and aerate and loosen the soil with their little tunnels all through the cooler months.
Here are the steps:
- Cut down any tall vegetation and woody weeds in your new garden location. Remove any woody material or things that have gone to seed. Lay a base layer of cardboard or newspapers at full thickness over the area. Make sure to overlap the edges. This is biodegradable and keeps the light from reaching the stuff underneath.
- Next add a layer up to 4 inches deep of soil improvers - compost, grass clippings, leaf mold or fallen leaves, composted manure, mushroom compost, or animal bedding (old straw or hay). A mixture of these materials is good. You can buy many of these at a garden center, if you don't have them laying around, but leaves and grass clippings are free (so is animal bedding and manure, if you a lucky enough to have animals! No dog or cat poo though, these can contain icky things that can infect us as well).
- Then add a top layer of straw or hay. This will retain moisture and look good. Wood mulch looks good, but a caveat - wood actually takes nitrogen out of the soil as it breaks down. Shredded bark mulch is a better choice, but expensive. I'd stick to straw.
- Water this all to settle the layers and keep it all from blowing away.
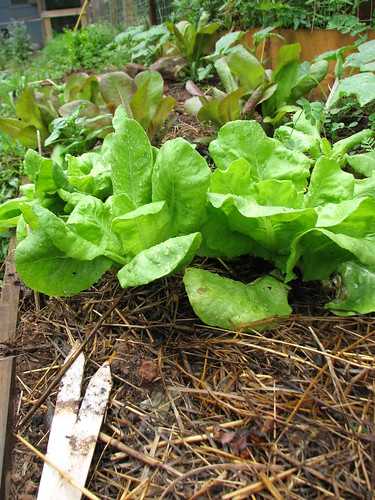
In the first year, it's best to grow transplants. Small seeds and root crops are suitable for the first year. If time has done the work for you, the light blocking layer will start to break down and the organic materials layer will start to mix with the soil. If you have a problem with bigger perennial weeds, just dig down through the layers of mulch and dig out. You can always add a second layer to help block these out.
I've found that a crop of potatoes is excellent at helping to break up the soil. These can easily grown using thick layers of straw as mulch. But a warning! Once you have homegrown potatoes, like their cousin tomatoes, store-bought will never do. I promise.
This method can also be used with existing beds to cut down the weeds and improve the soil. I did it over the winter with several rows in our garden (I need to see things to believe them, you know) and the difference is amazing. I'm finally winning the battle with mustard garlic and creeping buttercup. This fall all rows get this method.
That's it for this week. Send any questions, and I'll try to answer them. It may help me come up with a topic for next week!


Oh maggie, these gardening lessons are SO good! If only I'd have had them last fall when I was trying to get my beds ready. I swear I read everything I could get my hands on, but nothing substitutes for passing information on person to person. I'll use this technique for the new beds I think I want to prepare for next year.
ReplyDeleteHere's my question. It may be beyond your personal experience, but maybe not. It seems like it could be more of an urban/suburban issue than a country one.
ReplyDeleteMy bed digging experience last year presented a couple of challenges. First, I didn't know what I was doing. That's fine though. I ripped out sod and then put compost on top. No double digging or anything.
The main problem I encountered was tree roots! There were so many that cut through the space I wanted to garden. I certainly didn't want to kill the trees.
What can you do? Do tree roots just require a raised bed?
Stew - glad to help. I've had lots of urban gardening experiences! I think the best thing to do in your situation may be raised bed built up above the surface. You can build edging or just build up mounds. Use the same technique, but add more compost and soil to help raise it up.
ReplyDeleteThe good thing about contained raised beds is that it's easier to control weeds. That's in theory, of course! We built some contained raised beds this spring and used compost and dirt from the site and I'm still weeding!